Friday, January 29, 2010
Taped Mold & Cut Base
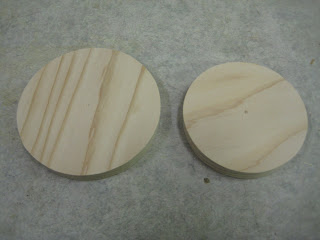
I cut and sanded a 3.5" diameter circle for the base and wasn't pleased with the weight. I decided to cut a smaller circle out of the same board and am going to stack it on top of the other for increased stability.
As for the mold, it's ready to be put in the vacuum tomorrow morning since I just covered it in sealing tape. It does have a few pointy corners that may need to be quickly sanded-down prior to being placed in the bag, though. Other than that, all should be well and ready!
G
prepping for the vacuum bag
With the mold nearly ready to go, I cut out some bendy ply strips for the final product. The mold still needs to be covered in sealing tape which I'll purchase from the Duck Store tomorrow morning. I already have the blue painter's tape that some other students have been using in conjunction with the sealing tape, but I don't think it'll be necessary for covering up the nails.
For my first use of the vacuum bag, I'm gonna use six double-layered sections and hope that the end result will have the appropriate curves. If not, I'll have to go for a third layer.
G
Wednesday, January 27, 2010
Finished Mold
I finally completed my mold today. I left it in the shop with claps on and it should be plenty solid by tomorrow morning when I test it out with some of the bendy ply.
I used the nailgun on the outside of the mold to fasten the other type of bendy wood (I forgot what it's called). The nails hardly left any impressions and are fairly flush with the wood. I think it's ready to go in the vacuum bag.
G
I used the nailgun on the outside of the mold to fasten the other type of bendy wood (I forgot what it's called). The nails hardly left any impressions and are fairly flush with the wood. I think it's ready to go in the vacuum bag.
G
Saturday, January 23, 2010
Prototype and augmented design
As for the color of the lighting, I might just opt for an LED light bulb that has several different color settings. If not, I may just purchase some of the colored plastic sheets, cut and curl them, slip one over a standard bulb at a time, and switch out for different moods.
Next post will cover some of my mold progress. Hopefully I'll be able to finish or get near to finishing it tomorrow.
G
Friday, January 15, 2010
starting the prototype
With some of these sketches to the left, a second material such as frosted glass would be added to serve as light bulb shrouds. So, visible bulbs would later be covered as to lessen some of the light's harshness.
Since I didn't want to rely on glass so much with my project, I opted for the lower right-hand design. In class yesterday, application of the heat gun was quite successful in getting the appropriate curves in the wood. Relatively quick and easy, the heat gun method was a blessing for constructing my lamp prototype.
However, getting identical results from the heat gun for 6 pieces seems highly unlikely and I'll probably need to construct my final model using the vacuum bag. As for the prototype, I'll need to spend hours finishing it up with more heat application, hot glue, and sanding. Pics of it should be posted by Monday night!
G
first post! - lamp objective
How to hide the light source without negating its primary function?
This has been my ultimate goal in sketching up acceptable lamp designs. Unless a statement by the designer, I don't think the light bulb should be blatantly visible to the user. Not only does this often emit harsh light for the human eye, but it also seems like an oversight by the designer. Lighting may be the central theme of the lamp, but the look of the common bulb often conflicts with the lamp's design. For these reasons, I've been experimenting with the size, bends, curves, and placements of the lamp pieces. If I am to block the direct source of light, I must make sure that it is redirected and allowed to escape. In this process, the bulb is concealed but still provides light.
I'll post scans of a few of my sketches in the next post. Cheers, yo!
G
Subscribe to:
Posts (Atom)